Maybe you’ve never heard the term. Maybe you’ve heard it but wondered: what exactly does neutral spine mean? And why is it so important? The definition is quite simple: neutral spine means good posture as it relates to your back and neck. It’s importance cannot be overstated—neutral spine is the position in which your back and neck are placed under the least amount of stress and strain, allowing them to function properly without damage and, therefore, without pain.
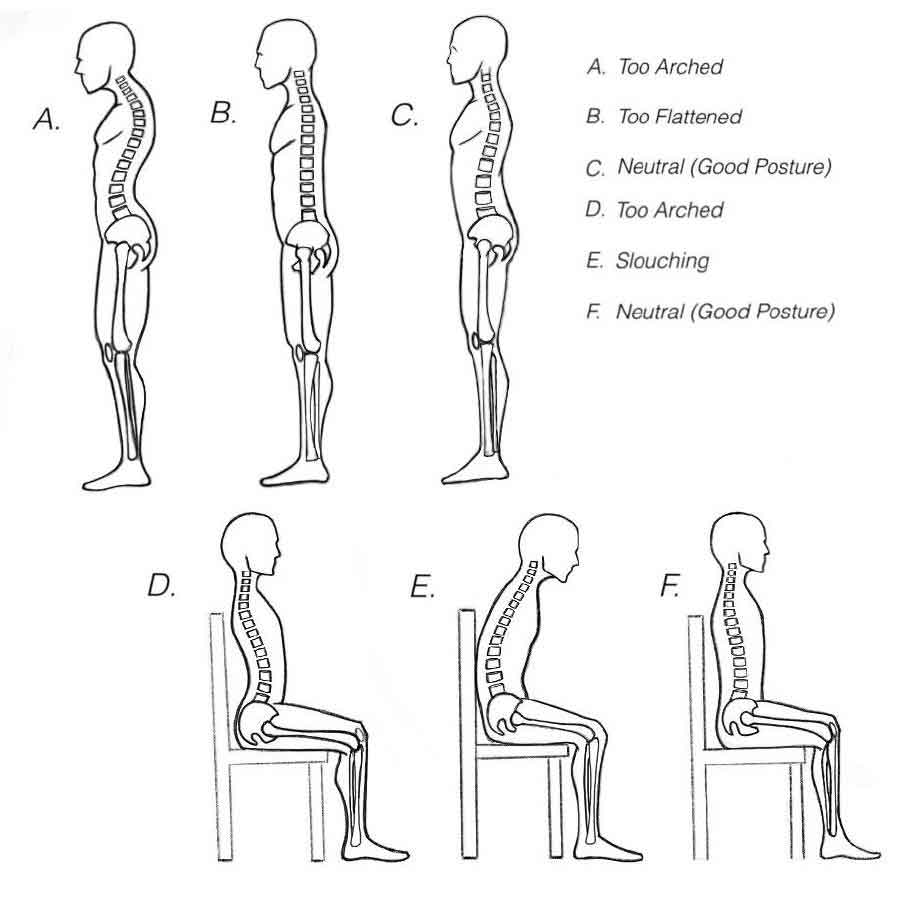
These pictures show you what an ideal neutral spine looks like:

Note the natural curves throughout the back with a neutral spine. These curves are ideal and are the positions in which your spine can do its job of supporting the body with the least amount of damage and pain. Many people over the age of 30 will have some degree of degenerative changes (commonly called degenerative disc disease) and may not be able to get their spines in this exact position. But even getting very close to the ideal is very good for your body.
Neutral spine is an integral part of relieving back and neck pain
There are four steps you can take to position your spine to relieve back and neck pain:
- Learn to find your neutral spine
- Learn how to brace your spine with your body’s core muscles
- Learn to move while maintaining neutral spine
- Strengthening core muscles to maintain neutral spine at all times
By following these crucial steps, your hips and shoulder joints will move independently of your spine, allowing you to perform any and all movements and tasks without aggravating your back or neck, and stay pain-free.
For some people, these steps may seem a little overwhelming—they don’t know where to start. But over time, they are pleasantly surprised to find it becomes second nature.
Keep in mind: keeping your spine neutral is how humans are supposed to move. Your spine is a support structure upon which your arms and legs rely to move. Your spine isn’t supposed to move a lot during most activities, especially not with load or in repetitive motions. If you think of a car, your spine is the chassis and your arms and legs are the axles and wheels. The chassis is meant to be stable, with movement happening in the axles and wheels. It’s the same with your spine, arms and legs.
How to find your neutral spine
It’s quite easy to find your neutral spine:
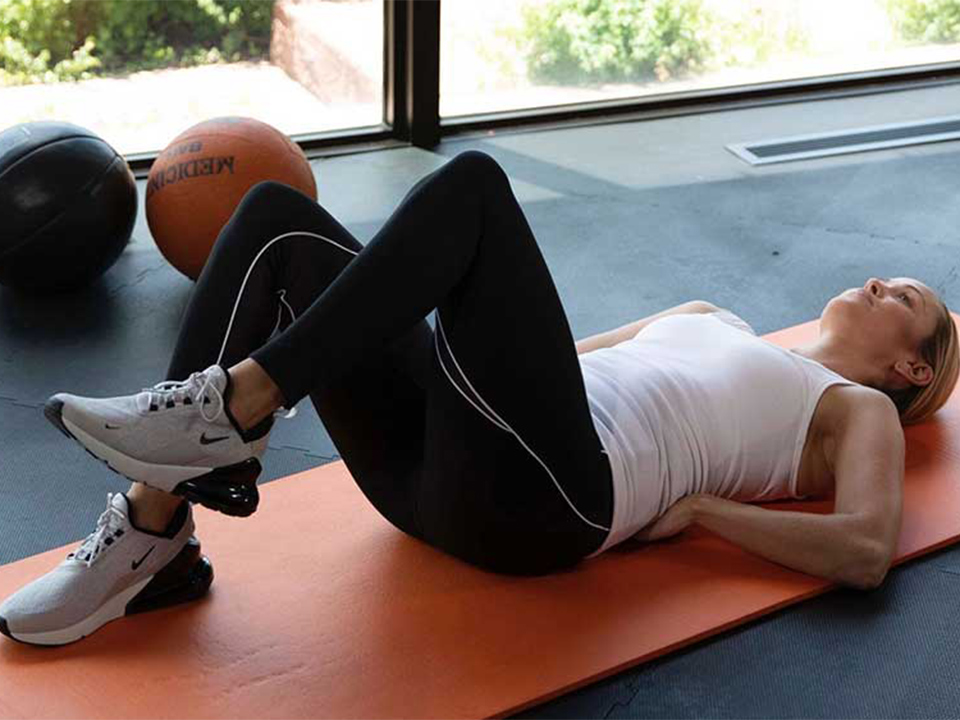
- Lie on your back with your knees bent and your feet flat on the floor.
- Try to relax everything in your body and just breathe.
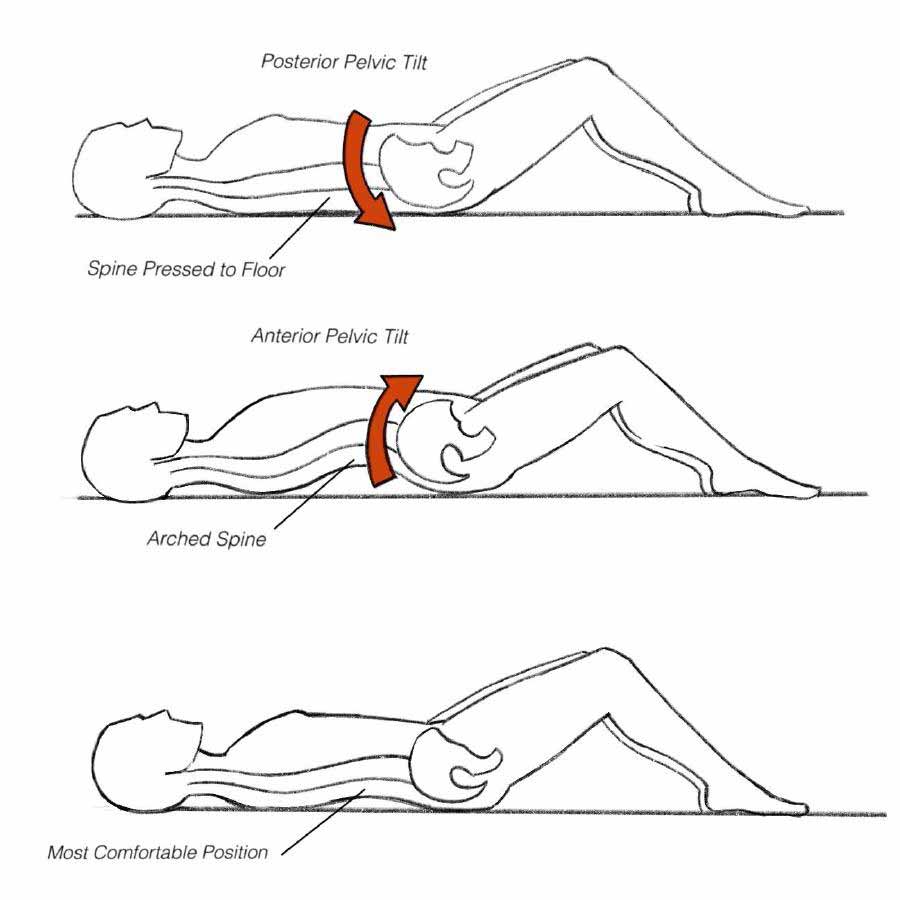
- Start by performing a pelvic tilt (see the diagram below): flatten your low back into the floor, and curl your tailbone upward. This is a posterior pelvic tilt. Now arch your back so that your low back comes off of the floor and point your tailbone toward the ground. This is an anterior pelvic tilt. Now, slowly go back and forth between those two motions a few times.

Find the position in your low back between the two extremes of flattening and arching that feels the most comfortable and stop there. Hopefully this is a position in which you feel no pain. If you can’t get to a pain-free position, that’s OK—just stop where you feel the least pain. This is your neutral spine.
We cannot over-emphasize how important it is to find your neutral spine. Everyone’s neutral spine is a bit different. It depends on the anatomical condition of your lumbar spine. For most people, there will be a gentle curve in the low back. For those who already have a disc bulge or related condition, their neutral spine might be a more arched lower back. For those with stenosis, their neutral spine may be a little more flattened than the one in our picture. Don’t worry.
Whatever feels the most comfortable for you is your neutral spine—for now. In time, your posture will improve. Start our steps over and try to find it again. Practice several times until you feel comfortable with what you feel is your neutral spine.
Core bracing with neutral spine
Now you must learn to maintain your neutral spine while moving your arms and legs. This means stabilizing the neutral spine by tightening, or bracing, your core.
Steps for neutral spine with core brace:
- Lie on your back with knees bent and feet flat on the floor.
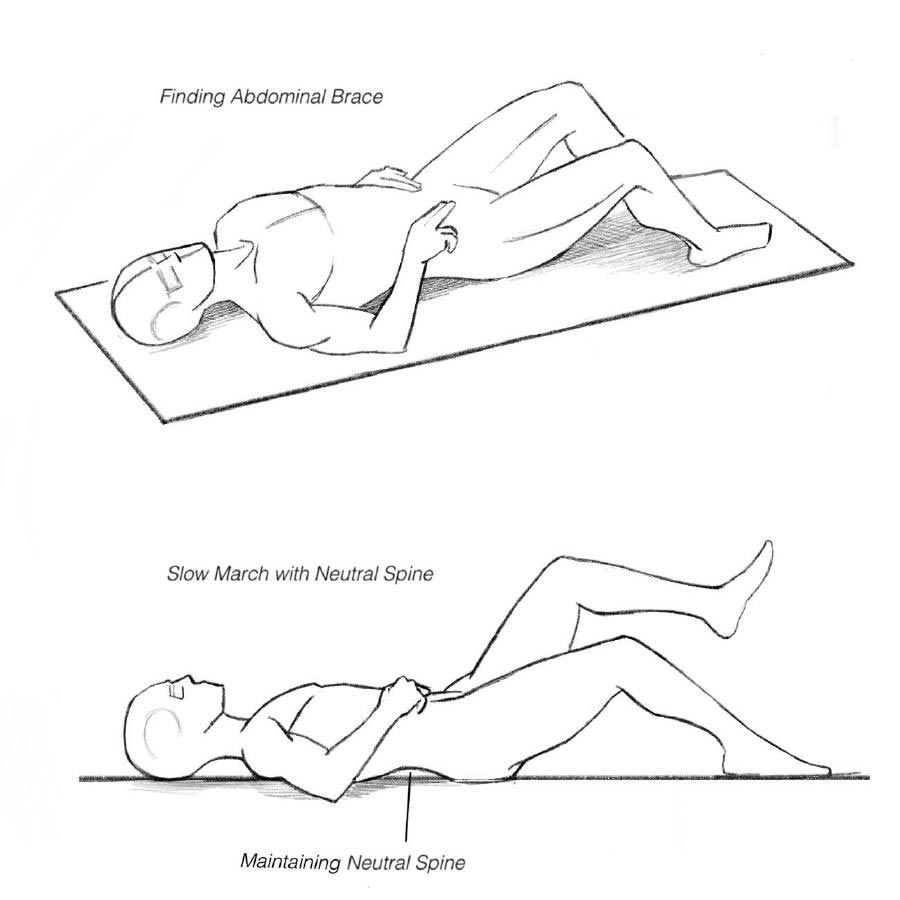
- Find your neutral spine using to the previously described steps. To test whether you’re getting it right, put your hand on the insides of your hip bones — fingers pointing in and poking your belly, thumbs in the back. Now gently press inward into your abdomen.
- Lightly tense the muscles under your fingers. You’re trying to reach the muscles that are a layer or two down, not the ones you feel on the surface. The easiest way to tense these inner muscles correctly is to imagine that someone is about to drop an apple on your stomach (as opposed to a bowling ball).
- Now tighten the muscles under your fingers. This should only be about 20% of your maximum contraction. What would you naturally do in anticipation of the apple falling on your belly? You would lightly tense or squeeze the abdominal muscles. Remember, it’s not a bowling ball so it only needs to be a slight contraction, not a full contraction.
- Now practice breathing without relaxing those muscles. As you breathe in and out, the tension in your abdominal muscles should stay the same.
- Can you maintain a normal breathing rate while you contract those muscles? If not, you are probably using your diaphragm more than your abdominal muscles.
- Does your stomach stick out when you try to engage those muscles? You are bearing down too much (think being on the toilet and straining). Try it again.

Practice breathing a few times while maintaining that abdominal brace. Practice this until you feel comfortable with it. In time, you want to be able to easily carry yourself with a slightly tightened core all the time, maintaining a neutral spine and good posture. Therefore, the next step is to start to move the legs while maintaining your neutral spine and core brace.
Slow march with neutral spine
So far, you’ve found your neutral spine and you know how to brace your core. Now, it’s time to learn to move with a neutral spine. To do this, we once again start with finding your neutral spine.
- Find neutral spine.
- Engage the core.
- While maintaining core engagement, slowly lift one foot off the ground. Move from the hip joint, keeping the knee bent without letting your low back arch or flatten into the floor. (If your neutral spine was already flattened into the floor that’s OK, just don’t push it harder into the floor when you do this.) If you can’t tell whether your back is moving, put a hand under your low back to see whether it moves when you do the leg movements. If you can’t do that because of a shoulder issue, ask a friend or family member to help.
- Return the lifted foot to the floor. Here’s where you need to concentrate: when you switch from one foot to another, focus on not turning off your core brace. You shouldn’t feel a shift from side to side in the torso when you switch legs. If you did, reset and try again. Pain might also be your guide. It’s possible that if you let go of your core brace while doing this, your back will hurt.
- Now put it all together. Try slowly “marching” back and forth without moving your low back.
If you do these steps correctly, you are on the path to solving your back pain. Once you have mastered this movement, the real work of strengthening your muscles begins.
Your next step is a comprehensive spine-healthy movement and exercise program to change the way you move and rebuild your spine’s natural support structure (your muscles). Together, these simple but vastly effective exercises can treat the vast majority of back pain causes. Now get marching.


